

























Affiliate disclosure: This article contains affiliate links. If you click and purchase, we may earn a commission at no extra cost to you.
Table of Contents
◉ Introduction ◉ What Masking Is (and Why It Matters in Lightroom) ◉ The Core Tools You’ll Use Most ◉ Quick Reference: When to Use What ◉ Step-by-Step Workflow ◉ Portrait-Focused Masking (Clean, Natural, Fast) ◉ Street Photography: Direct the Eye with Shadows ◉ Pros, Cons, and Risk Management ◉ Practical Mini Case Studies ◉ Common Mistakes & Expert Tips ◉ Advanced: Building a Reusable “Cinematic Light” Mask Set ◉ Troubleshooting Guide ◉ FAQ ◉ Your Editing Game Plan (Do This Next) ◉ Meta & Keywords
Masking in Adobe Lightroom is often what separates a decent edit from an image that feels polished, intentional, and professional. When used carefully, masks help you steer attention, shape light in a believable way, and enhance detail only where it actually matters. In this walkthrough, you’ll follow a complete modern masking workflow built around the tools Lightroom users rely on most: linear gradients, radial gradients, AI-powered subject and sky selections, people masks, and luminance-based refinements. You’ll also see practical ways to combine masks through add, subtract, intersect, and invert so your edits feel cinematic and controlled instead of heavy-handed. By the end, you’ll have a repeatable system you can use on landscapes, portraits, and street photography without making your images look artificial.
Don’t have Lightroom yet?
Get Lightroom so you can follow this masking tutorial step by step and apply each technique to your own photos.
Get LightroomWhat Masking Is (and Why It Matters in Lightroom)
Masking lets you isolate one part of an image and edit it independently from everything else. In Lightroom, the masking panel now includes AI-assisted tools like Subject, Sky, Background, and People, alongside classic options such as Linear Gradient, Radial Gradient, Brush, and refinements like Luminance Range and Color Range. You can also combine masks using Add, Subtract, and Intersect, giving you far more control than global sliders alone.
Without masks, it’s easy to push Texture, Clarity, Dehaze, or White Balance too broadly and end up with an overprocessed result. Masking helps you avoid that by allowing you to:
• Pull attention toward the parts of the frame that matter most
• Keep light and contrast believable rather than exaggerated
• Speed up your workflow with fast AI-assisted selections
• Adjust selectively without permanently locking yourself into the edit
The Core Tools You’ll Use Most
Linear Gradient (the everyday workhorse)
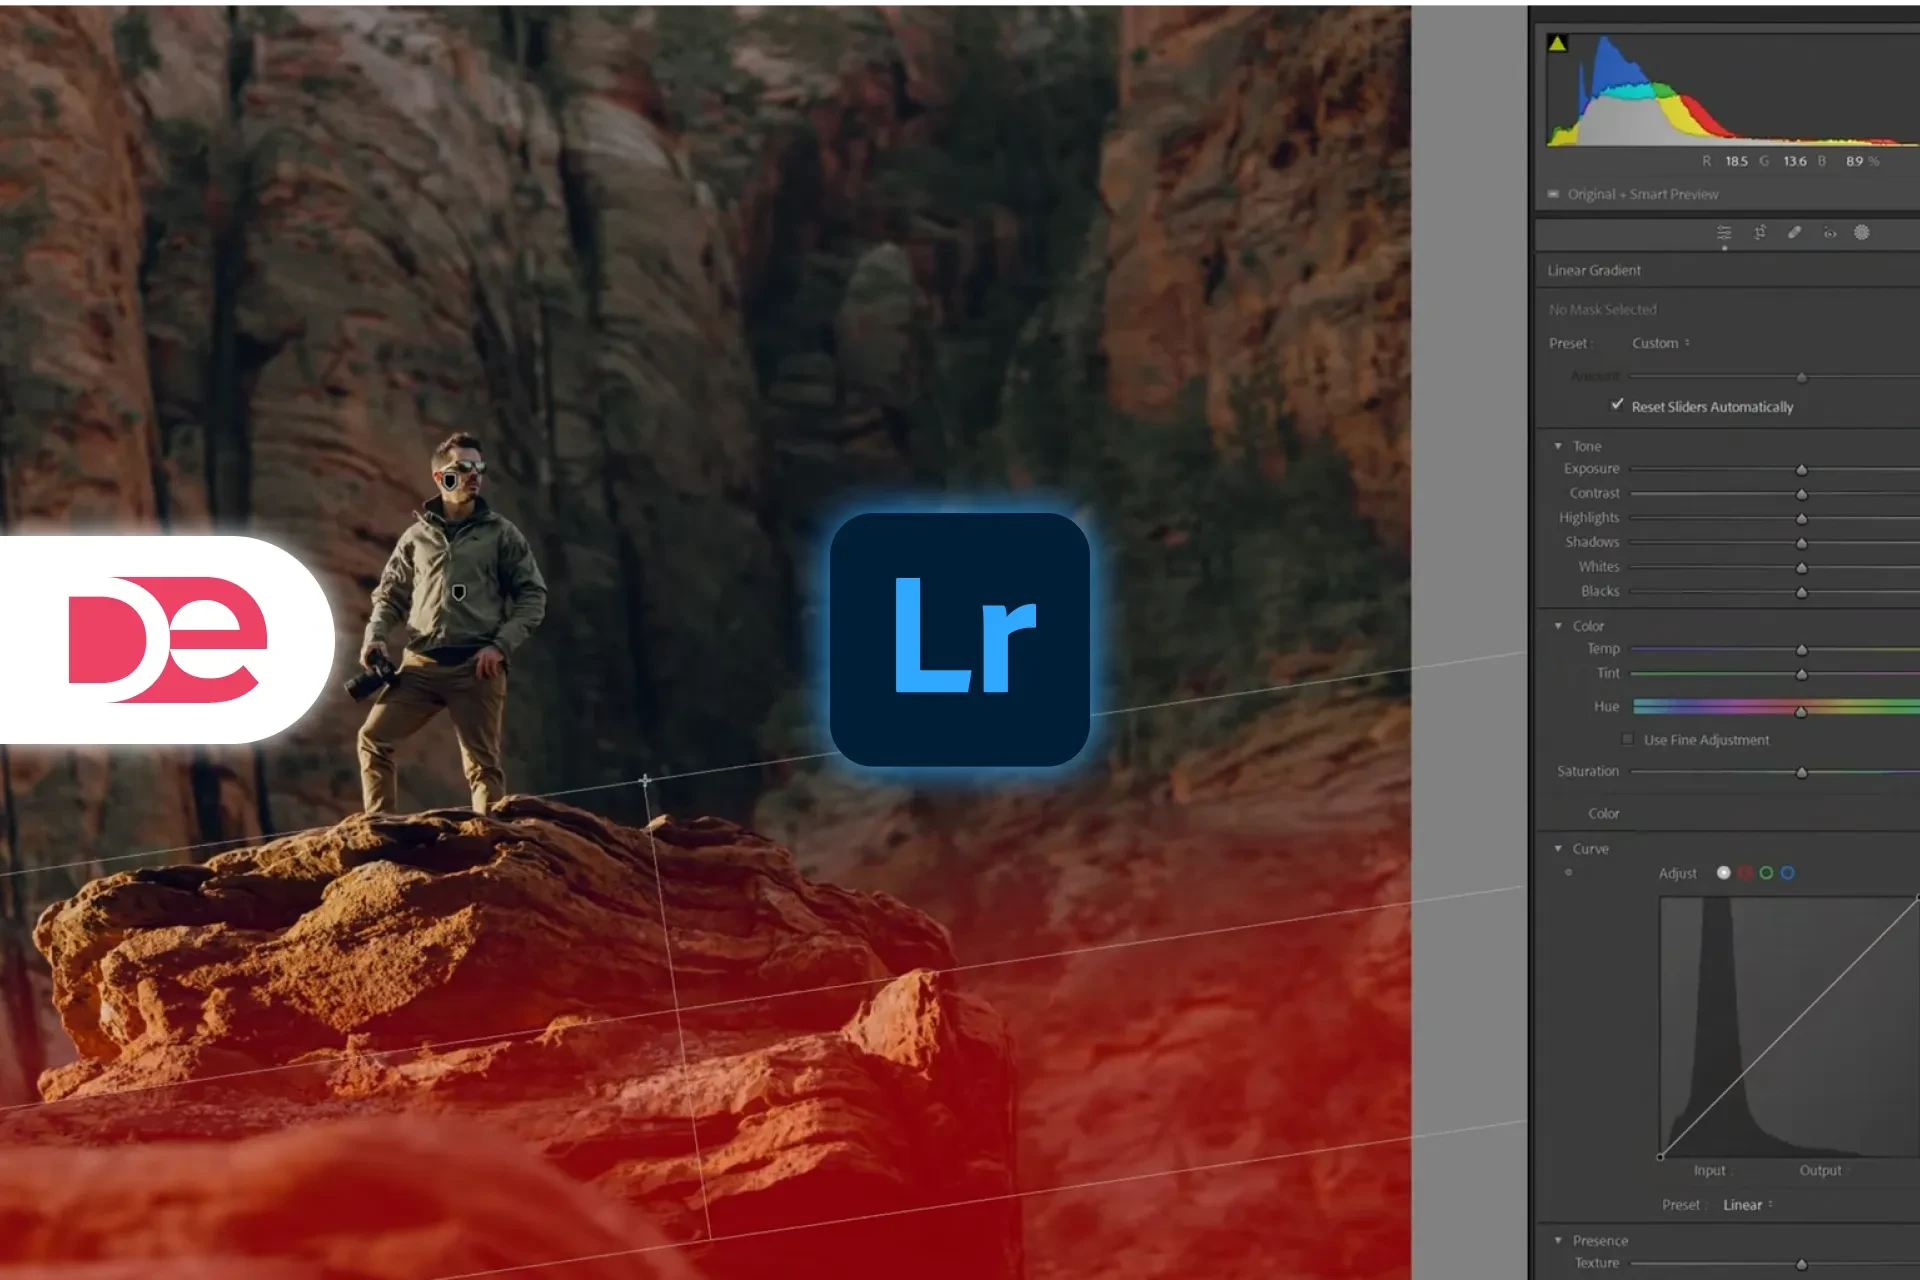
A Linear Gradient applies an adjustment gradually across a directional area. It’s perfect for building foreground depth, controlling edge falloff, or easing adjustments into a sky.
• Use it to strengthen detail in the lower part of the frame while keeping the mid-ground cleaner.
• Combine it with Intersect ► Luminance Range when you want the effect to affect only shadows or only highlights.
Radial Gradient (sculpt realistic light)
A Radial Gradient creates a soft transition from the center outward. It works especially well for glow, backlight, localized atmosphere, or subtle subject emphasis.
• Warm and soften areas where light should naturally gather.
• For a gentle haze effect, try a slight Exposure increase, a warmer Temperature, and reduced Clarity and Dehaze.
AI Selections (get to the point)
• Select Subject: Quickly isolates the main subject for controlled sharpening or definition.
• Select Sky: Separates the sky efficiently so you can adjust it without disturbing the rest of the frame.
• People (Face/Hair/Lips/Skin/Eyebrows/Clothes): Gives you region-specific portrait control in a few clicks.
Range Masks (pro-level finesse)
• Luminance Range: Limits your adjustment to brighter or darker tones; ideal for selective glow or highlight control.
• Color Range: Targets a specific color family, which is helpful for fine-tuning skies, foliage, or other isolated hues.
Quick Reference: When to Use What
| Mask Type | Best For | How to Refine |
|---|---|---|
| Linear Gradient | Foreground detail, edge darkening, sky transitions | Intersect ► Luminance Range to isolate bright or dark tones |
| Radial Gradient | Glow, backlight, localized atmosphere | Subtract ► Subject to keep the glow behind the subject |
| Select Subject | Fast local enhancement on the main focal point | Use Texture, Clarity, and Sharpening conservatively |
| Select Sky | Sky color, contrast, and tonal control | Intersect ► Linear Gradient to soften transitions near the horizon |
| People (Face/Hair/Lips) | Natural portrait retouching | Use negative Texture/Clarity on skin; subtle positive Texture on hair/lips |
| Luminance Range | Highlight glow and tonal refinement | Use the handles to isolate bright tones and feather the selection smoothly |

Master Lightroom masking with the right tool from the start
Use Lightroom to build cleaner subject separation, softer glow, and more natural local adjustments as you work through each step of this tutorial.
Try LightroomStep-by-Step Workflow
1) Build Grounded Depth with a Linear Gradient
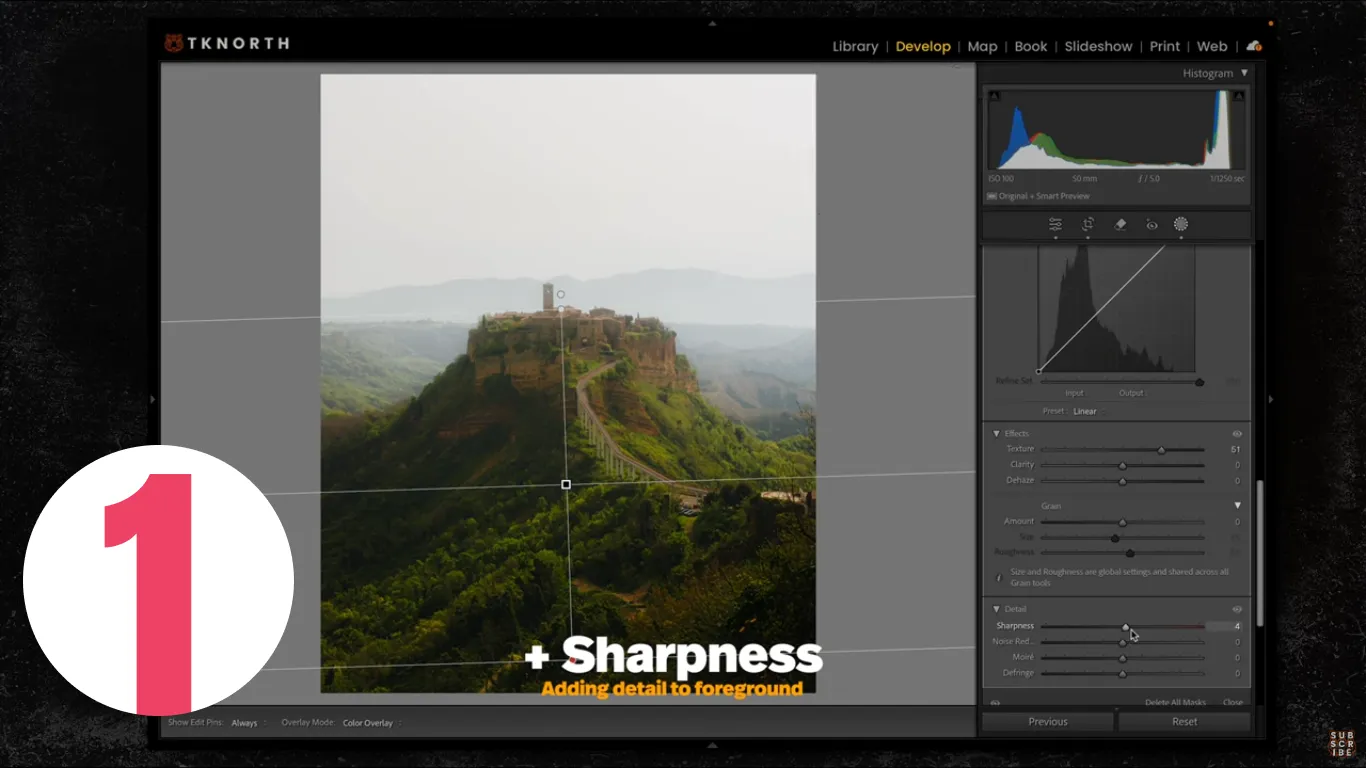
Open the masking panel in Lightroom (or press Shift+W), choose Linear Gradient, and drag upward from the bottom of the frame so the foreground receives the strongest effect and the adjustment fades naturally into the mid-ground.
• Increase Texture and add a little Sharpening to make nearby elements feel more tactile.
• Be restrained with Clarity; too much can make the foreground feel harsh.
Why this works: objects closer to the camera typically show more visible texture. Strengthening that detail only in the foreground creates depth without making the whole image feel crunchy.
2) Paint Atmosphere with a Radial Gradient
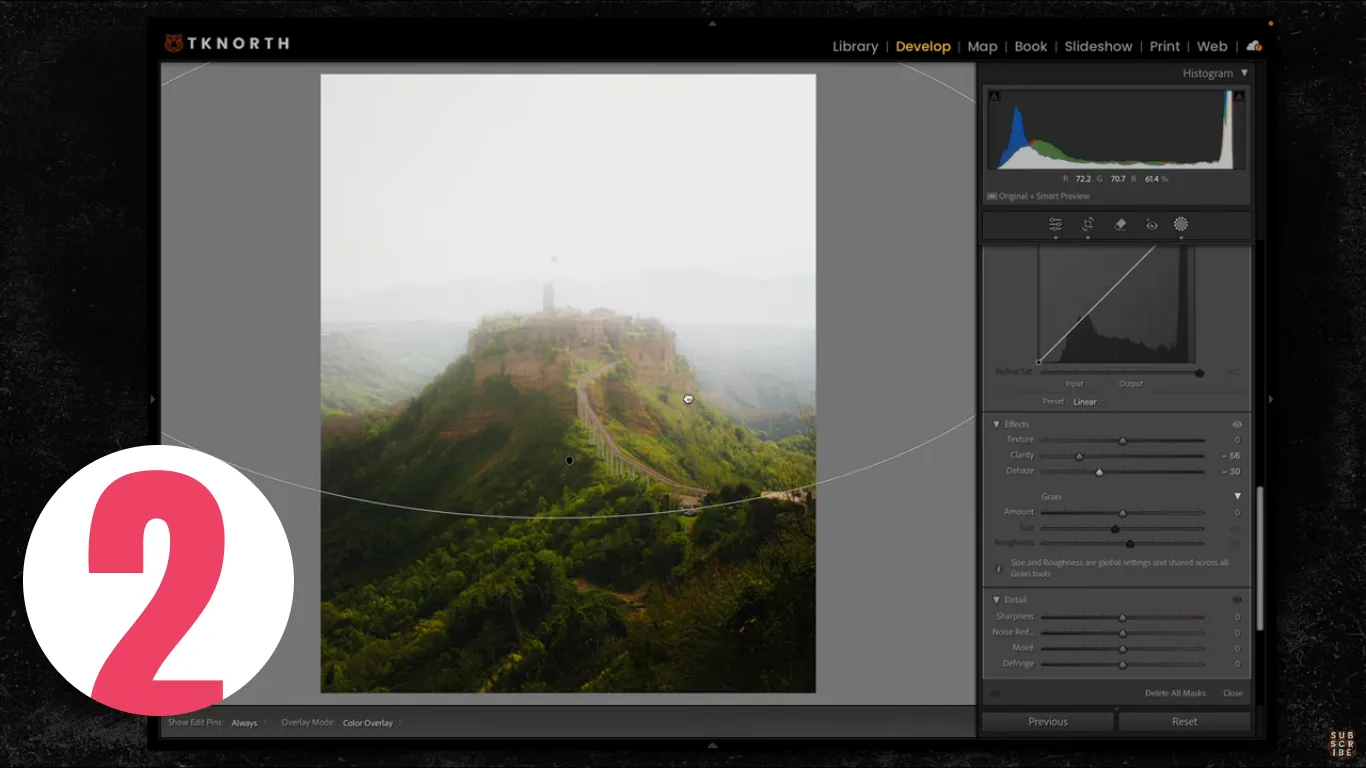
Add a Radial Gradient over the area where you want a pocket of glow or haze. Raise Exposure slightly, shift Temperature a little warmer, and lower Clarity and Dehaze to create a softer, atmospheric effect.
• If the adjustment spreads onto buildings or your main subject, click Subtract ► Object or Subject and remove those areas.
• Repeat the subtraction on smaller elements if they need to stay crisp.
The result should feel like real light building up in the scene rather than a haze layer thrown across everything.
3) Pop the Subject—Lightly
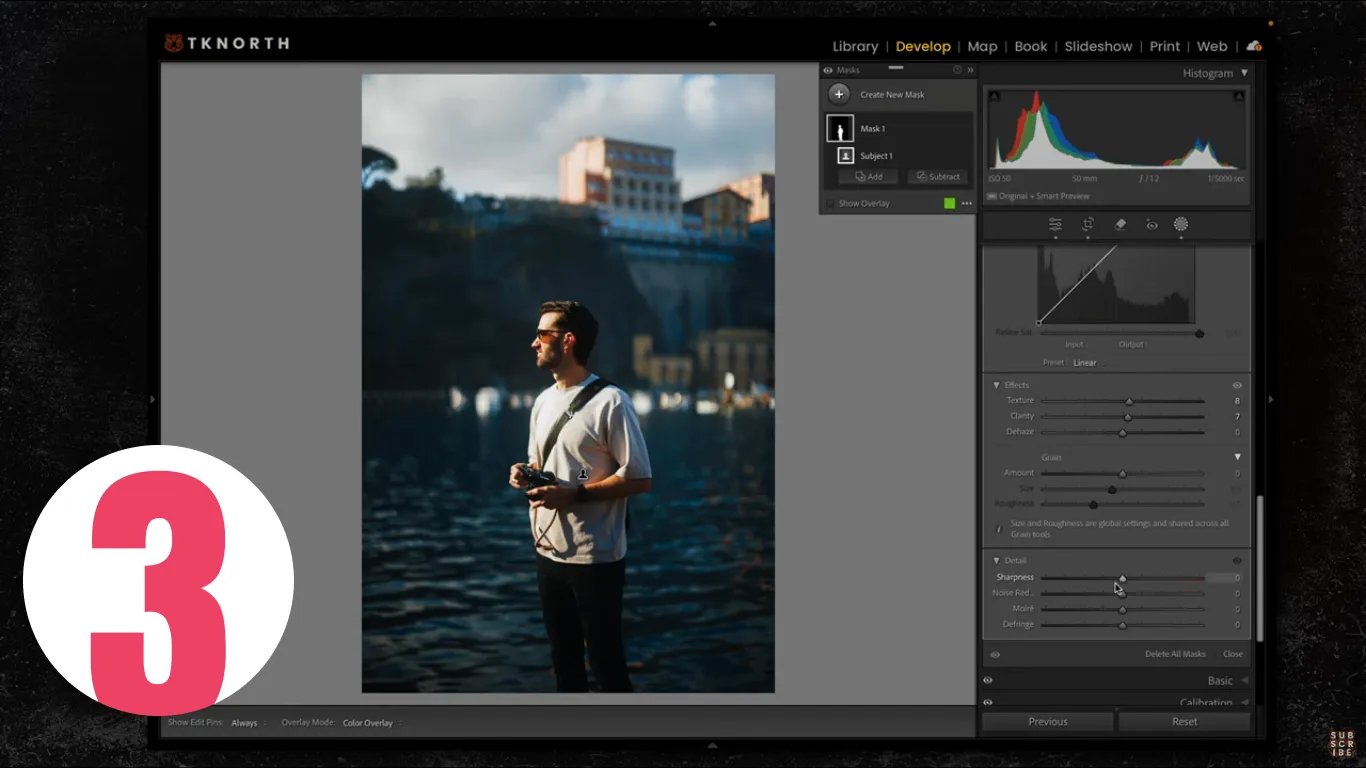
Use Select Subject to isolate the main subject, then add just a modest amount of Texture, Clarity, and perhaps a touch of Sharpening.
• Avoid strong Exposure increases unless the lighting in the scene truly supports it.
• If you already created a backlight or glow mask, subtract the subject from that mask so the glow remains behind them.
4) Sculpt the Direction of Light
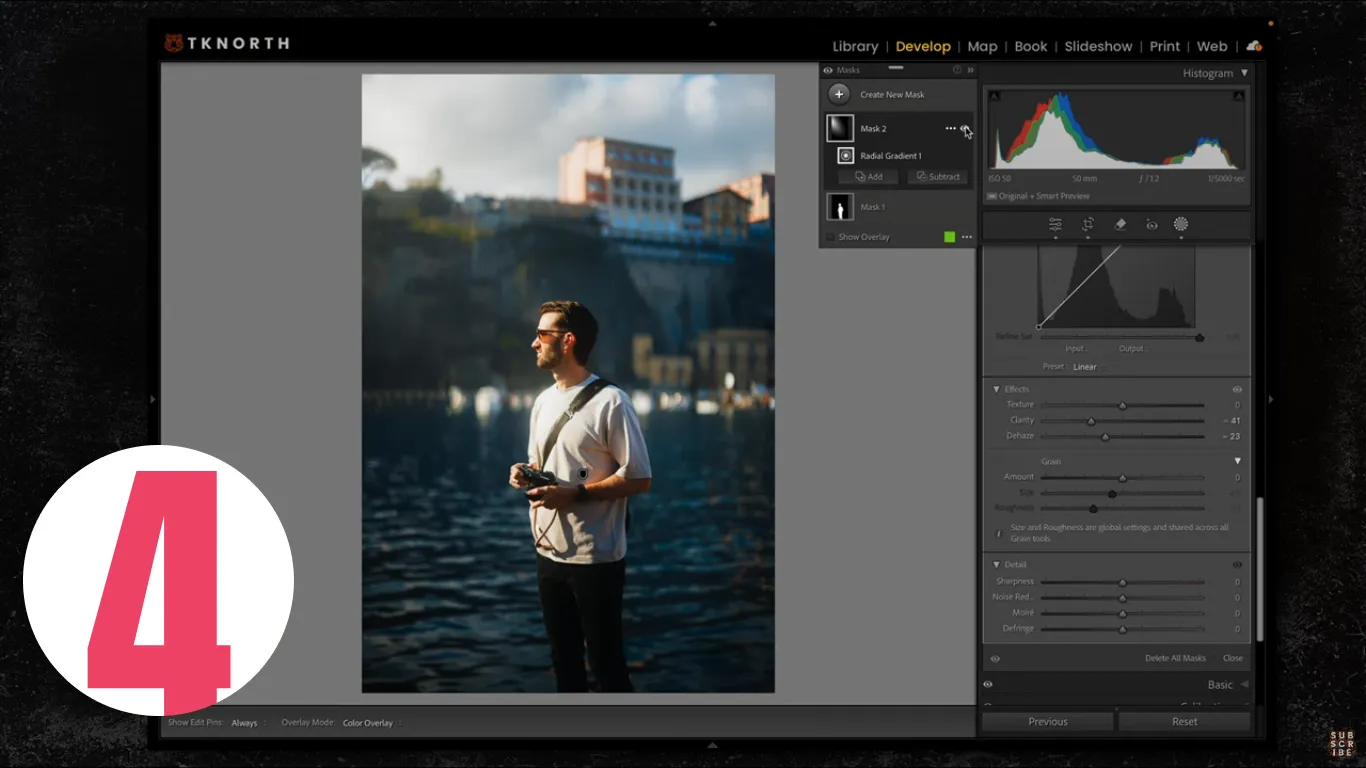
Create another Radial Gradient that follows the natural direction of the light in the frame. Look for the brightest zone or use existing shadows as a guide. Warm the mask slightly, lift Exposure a bit, and lower Clarity and Dehaze to soften it.
If the front of the subject should remain untouched, use Subtract ► Subject.
Tip: the effect should be subtle enough that viewers feel the light rather than noticing the mask itself.
5) Next-Level Combo: Highlight-Only Bloom
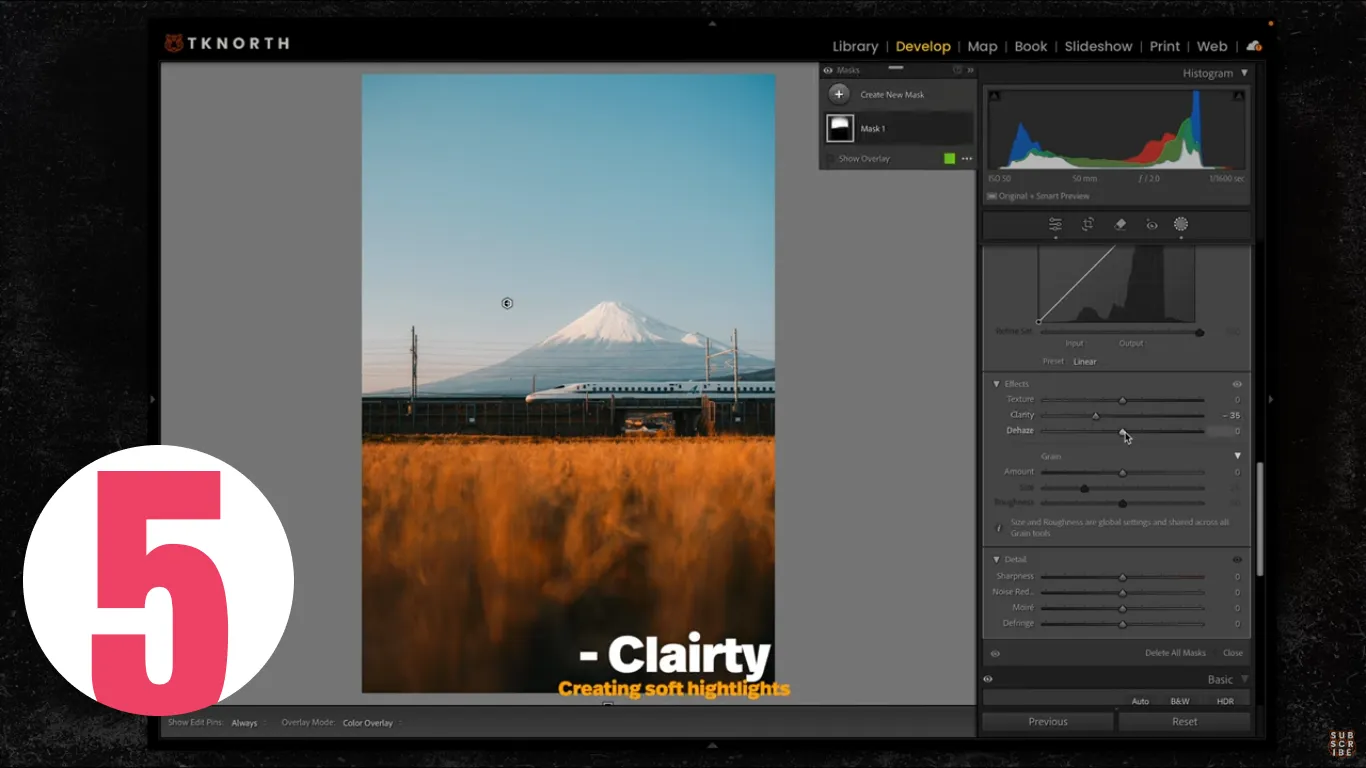
Create a broad Linear Gradient that covers the frame, then choose Intersect ► Luminance Range so the mask affects only brighter tones.
• Drag the luminance controls to isolate highlights and feather the selection smoothly.
• Reduce Clarity and Dehaze inside that mask to produce a gentle bloom effect.
This works because glow looks most convincing when it lives in highlights rather than being spread across the entire tonal range.
6) Make Sky Edits Look Natural
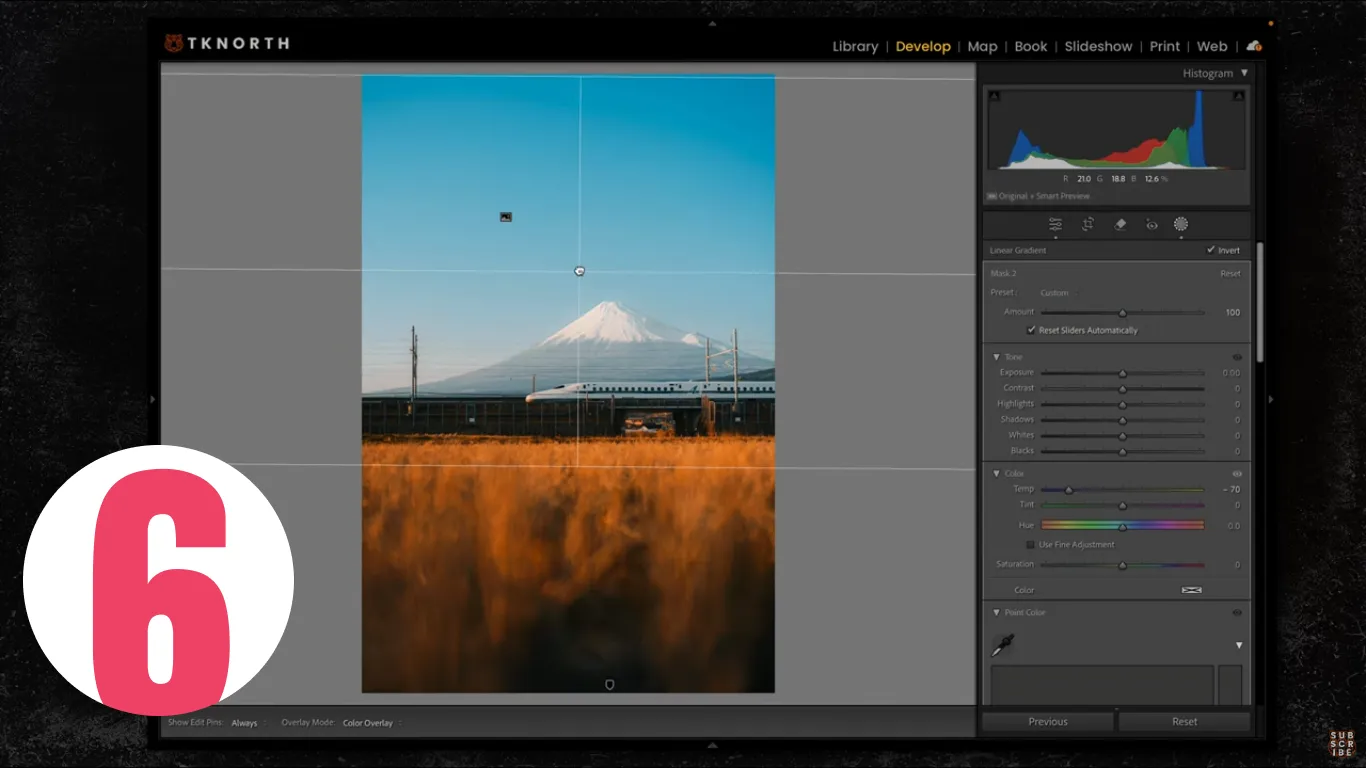
Choose Select Sky and make restrained adjustments such as a cooler Temperature or a slight Dehaze change. To keep the horizon from looking cut out:
• Use Intersect ► Linear Gradient and drag downward from the top.
• Let the mask fade as it approaches the skyline so the transition stays believable.
7) Add Micro-Contrast to Key Objects
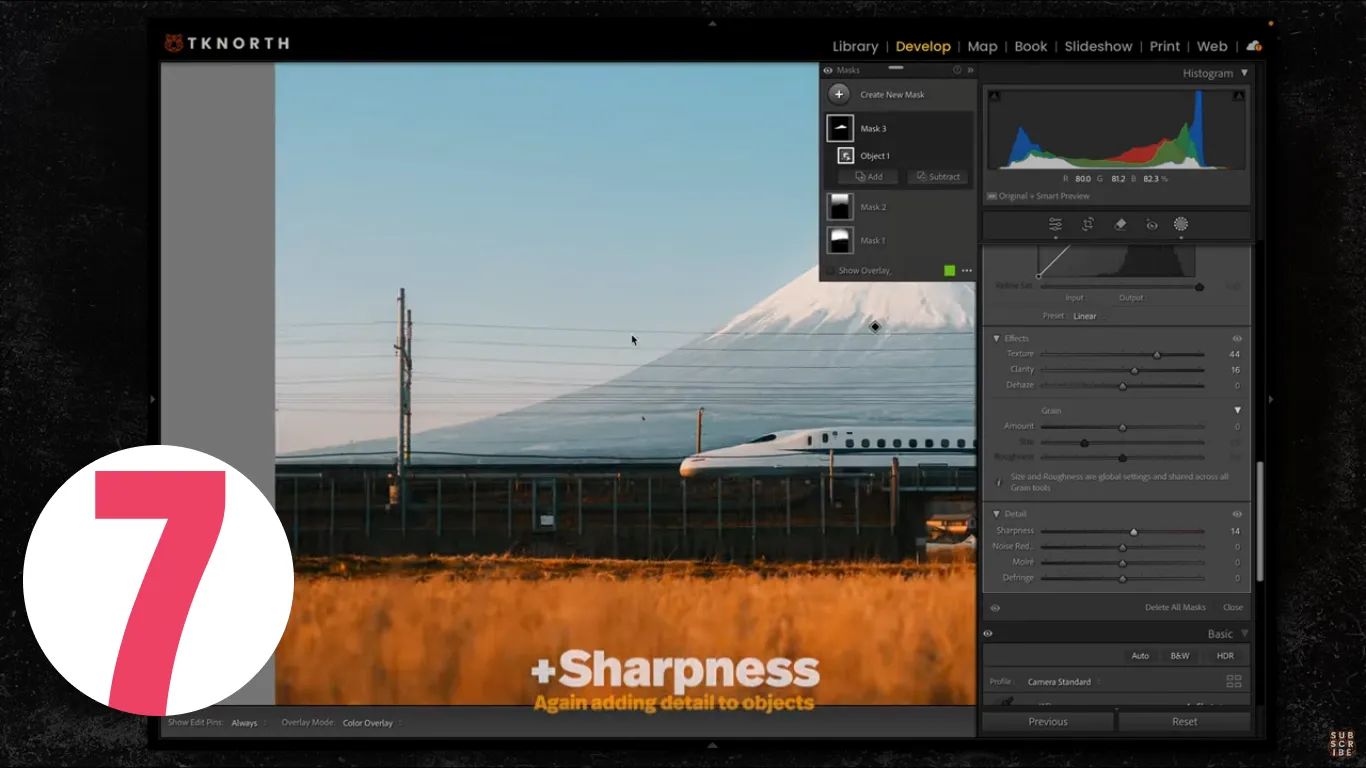
Use Add ► Object and roughly brush over important details like a mountain peak, a vehicle, or architectural elements. Then apply modest boosts in Texture, Clarity, and perhaps a touch of Exposure or Whites.
• Zoom in to 100% to check for artifacts or oversharpening.
• Turn the mask on and off to confirm the adjustment actually improves the image.
8) Invert to Target “Everything But…”
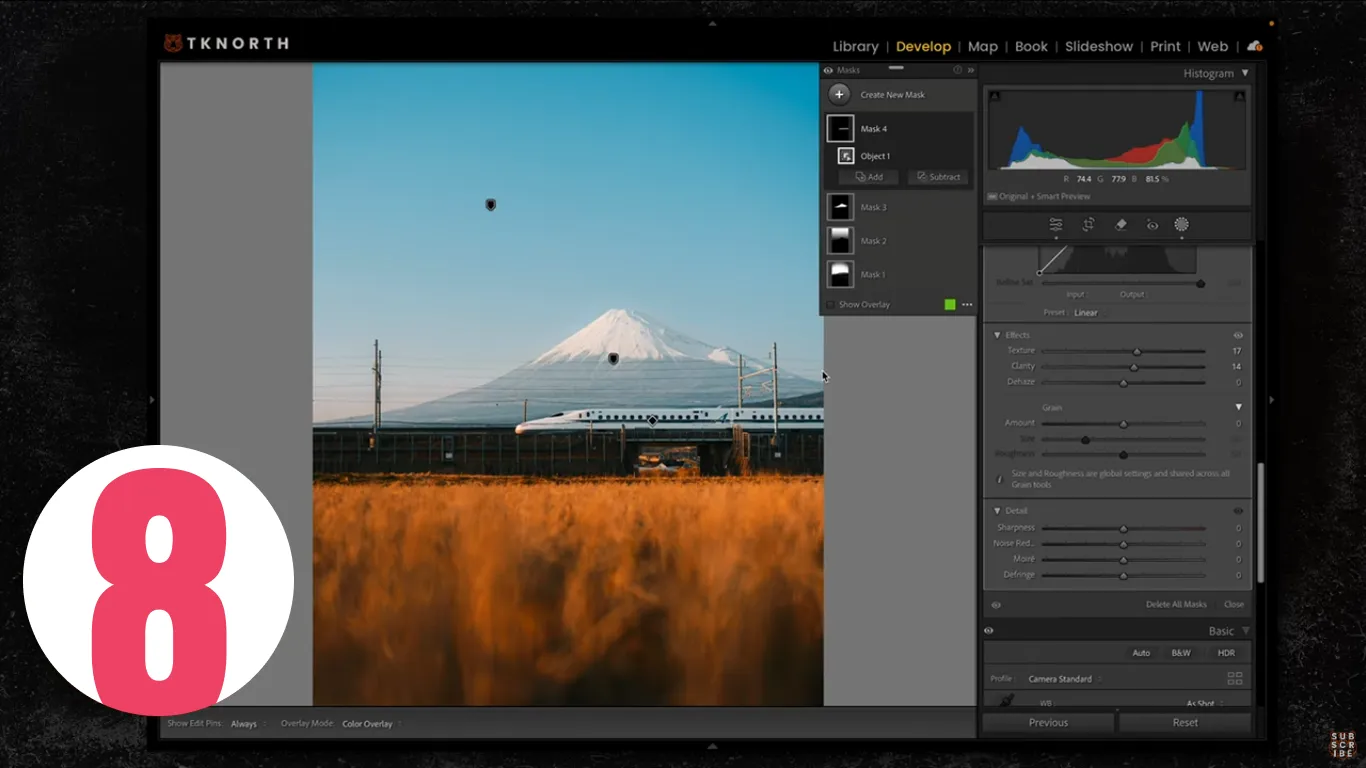
If you want to affect everything except one area, inversion is the fastest route. For example, use Select Sky and then choose Invert to target the non-sky portions of the image.
This is especially useful when you want to strengthen ground detail or foreground structure without creating awkward seams around the horizon.
9) Finish with Realistic Sun Direction

For the final pass, place one more Radial Gradient on the side of the frame where the sun or dominant light source would logically fall. Keep Exposure and warmth subtle, then soften the effect with reduced Clarity and Dehaze.
This last adjustment helps tie together the entire image so the lighting feels cohesive from edge to edge.
Portrait-Focused Masking (Clean, Natural, Fast)
AI People Masks That Matter
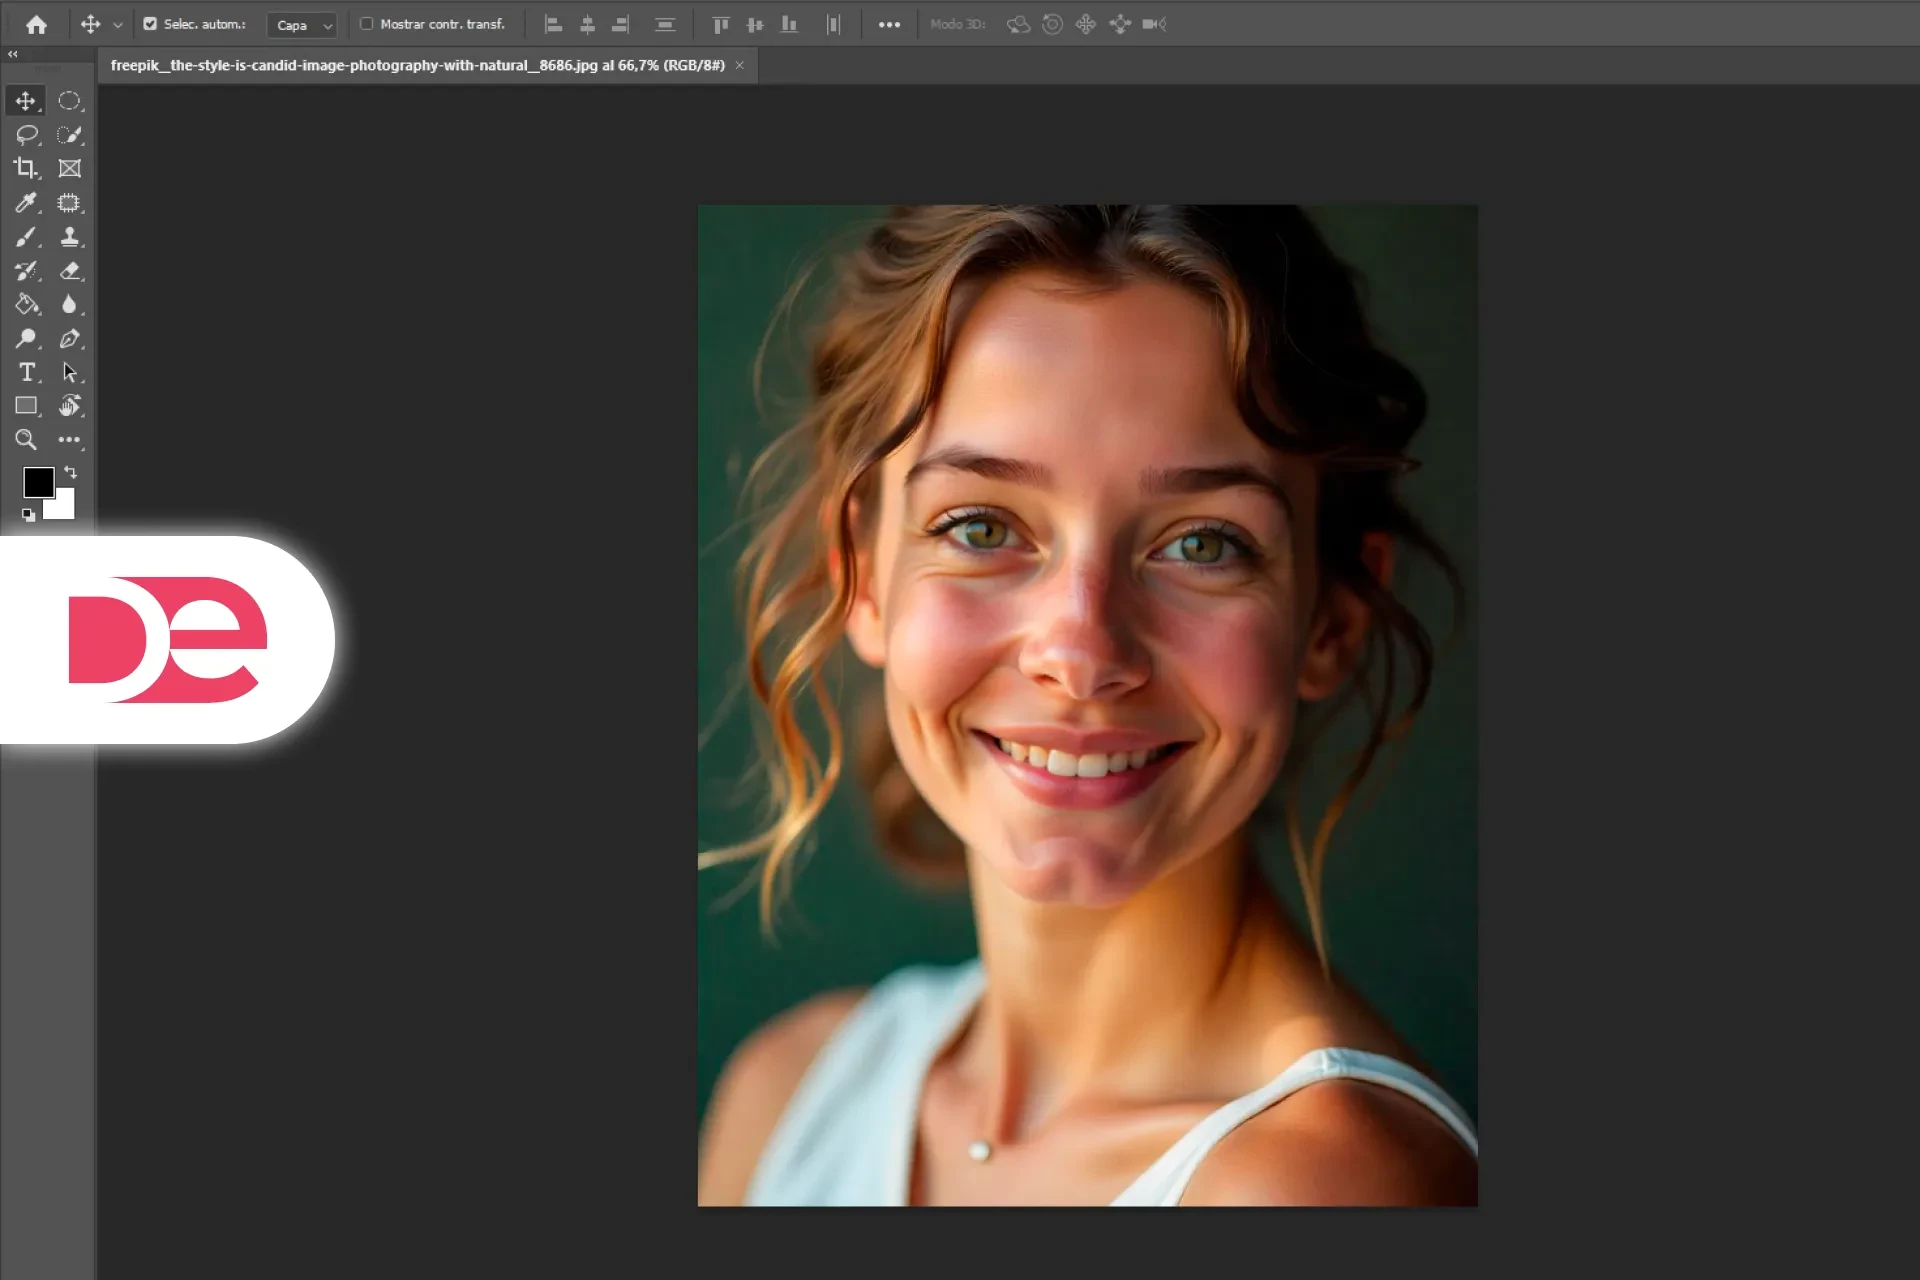
Open People and choose the face. Lightroom can generate separate masks for Facial Skin, Body Skin, Hair, Lips, Eyebrows, and Clothes, giving you more precise portrait control.
• Facial Skin: Apply a very small reduction in Texture and Clarity to soften unevenness while preserving natural skin texture.
• Hair & Eyebrows: A slight boost in Texture or Clarity can add shape and separation.
• Lips: A tiny increase in Texture can improve edge definition without making them look overedited.
If Lightroom selects the wrong area, open the mask and use Subtract ► Brush to remove the mistake manually.
To finish, place a Radial Gradient behind the subject and use Subtract ► Subject so the glow stays in the background instead of spilling across the face.
Street Photography: Direct the Eye with Shadows
Street scenes often become more compelling when shadows help guide the viewer through the frame. Instead of crushing blacks globally, use multiple Linear Gradients to darken corners, alleys, or naturally shaded paths.
• Use Add to stack several gradients that share similar settings.
• Rotate each gradient so it follows the real direction of the existing shadows.
• Use Subtract ► Brush to clean up spill over bright or complex areas.
• Lower Exposure and Shadows slightly inside those masks.
• If the blacks become too dense, lift the darkest point of the Tone Curve slightly for a softer filmic feel.
The goal is controlled separation, not heavy-handed darkness.
Pros, Cons, and Risk Management
Where Masking Shines
• It gives you local control that feels more realistic than broad global edits.
• AI tools speed up complex selections while still allowing fine refinement.
• Once you develop a repeatable system, you can save and reuse it efficiently.
Watch-outs and How to Avoid Them
• Halos around edges • Use softer feathering and reduce the strength of the mask.
• A subject that looks too bright in backlight • Remove the subject from the glow mask behind them.
• Hard-looking sky transitions • Intersect sky selections with a Linear Gradient.
• Over-smoothed skin • Keep negative Texture/Clarity minimal and avoid flattening natural texture.
• Excessive crunch from Clarity • Use Texture for fine detail and reserve Clarity for subtle shaping.
Practical Mini Case Studies
A) Misty Town at Sunrise
1) Linear Gradient (Foreground): Add Texture and Sharpening to give nearby trees and terrain more presence.
2) Radial Gradient (Haze Behind Town): Raise Exposure slightly, warm the Temp a little, then reduce Clarity and Dehaze.
3) Subtract ► Object (Town & Foreground): Keep the atmospheric effect behind the town rather than on top of it.
4) Check Balance: Toggle the masks and reduce strength if the buildings start to lose structure.
B) Solo Hiker Backlit
1) Select Subject: Add a touch of Texture and Clarity.
2) Radial Glow from Sun Side: Increase Exposure slightly, warm it subtly, and reduce Clarity/Dehaze for soft light.
3) Subtract ► Subject from the glow so the light remains behind the hiker.
4) Reality Check: Compare the result with the original scene and make sure the light still feels plausible.
C) Fuji with Speed Train
1) Select Sky + Intersect ► Linear: Refine the sky adjustment so the horizon stays clean.
2) Add ► Object (Fuji Peak): Add a little Texture, Clarity, and Sharpening to define the ridges.
3) Add ► Object (Train): Lift Whites or Exposure slightly and add Texture for separation.
4) Invert Sky: Apply extra detail to the land and subject areas without affecting the sky.
Common Mistakes & Expert Tips
Mistakes to Avoid
• Raising Exposure too aggressively inside a small radial and creating an obvious spotlight.
• Smoothing skin uniformly across every facial area until it loses natural variation.
• Using strong Dehaze in dark areas and introducing color shifts or banding.
• Treating Clarity as the solution for everything instead of using Texture more selectively.
Expert Tips You’ll Reuse
• Think about where the light comes from: every warm or bright adjustment should have a believable source.
• Use Intersect ► Luminance for highlight softness: it creates a more optical, less fake glow.
• Subtract fine structures: towers, poles, tree trunks, and edges often need manual cleanup in atmospheric masks.
• Save your best combinations: common setups like backlight glow, foreground detail, and highlight bloom are worth turning into presets.
• Toggle constantly: if the effect is immediately obvious, it probably needs to be dialed back.
Advanced: Building a Reusable “Cinematic Light” Mask Set
Create three masks, then save them as a preset:
• Foreground Texture (Linear): Bottom-up gradient; Texture +25, Sharpen +10, Clarity +5.
• Backlight Glow (Radial): Exposure +0.25, Temp +5–10 (in Lightroom units), Clarity −20, Dehaze −15, Feather 80–100; position manually per shot; often Subtract ► Subject.
• Highlight Bloom (Intersected): Linear covering frame ► Intersect ► Luminance Range (highlights only); Clarity −15, Dehaze −10.
Once applied, reposition the masks to suit each image and fine-tune the strength. This gives you a consistent cinematic starting point while still leaving room for scene-specific adjustments.
Troubleshooting Guide
• The sky mask looks too obvious near the horizon. Intersect it with a soft Linear Gradient and reduce the effect where the sky meets the land.
• Skin looks waxy. Ease back the negative Texture/Clarity and only use extra Noise Reduction if the ISO truly demands it.
• The subject looks pasted in. Make sure the environment also received subtle supporting adjustments and that the light direction is consistent.
• Shadows feel blocked up. Lift the dark point slightly with the Tone Curve on the affected areas.
• You see color fringing after strong Dehaze. Reduce Dehaze and rebuild contrast more gently with other tonal controls.
FAQ
Your Editing Game Plan (Do This Next)
1) Open a recent landscape photo and apply your three-mask preset: Foreground Texture, Backlight Glow, and Highlight Bloom.
2) Reposition each mask so it matches the actual direction of light in the scene.
3) Toggle the masks one by one and reduce them by 10–20% whenever the edit starts to feel too visible.
4) Save the refined version as a fresh preset so you can build a faster, more repeatable workflow over time.
Get Lightroom and Start Editing Better Photos